Space Designer brings furniture layout, clearance measurements and a reusable furniture collection together on your original plan image. It is included with Planner Plus. Start with a JPG, PNG or WebP, verify the scale and build a layout around the way you use the rooms.
1. Start with a clear image
Choose an original floor-plan image with readable dimensions, walls and doors. Open Space Designer, sign in with Planner Plus access, upload the image and choose Create workspace. Your original drawing remains visible as you arrange the furniture.
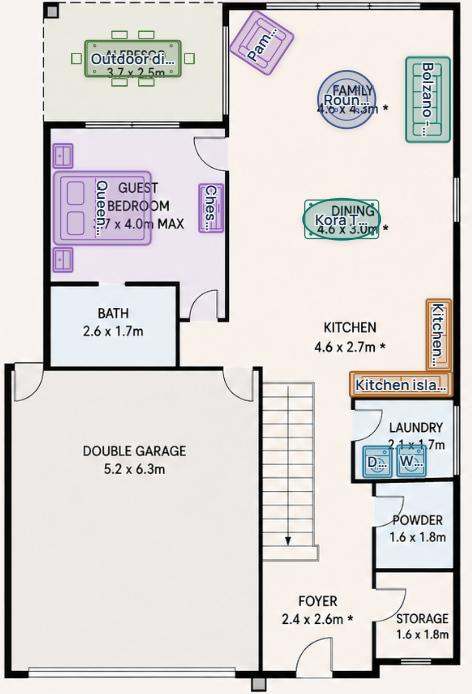
The example below shows outdoor dining, a guest bedroom, family seating, a dining table and kitchen islands. Use the room names, door positions and circulation routes to decide where the largest pieces should go first.
2. Review each floor and calibrate the scale
When the result contains more than one part, use the Part tabs to inspect each one. The Area & space planner view provides the area estimate, editable outline, room calibration and furniture tools.
Check the detected dimensions and trace a reference line over a known distance where needed. A valid reference line takes priority over the reference room. Check each floor against a printed dimension. Review whether balconies, the garage and the upstairs void belong in your chosen area before relying on a total.
3. Arrange furniture and make room for storage
In Area & space planner, choose Add furniture for ready-made symbols, or My furniture for your saved items. These panels open one at a time. Enter actual dimensions, move and rotate each item, duplicate repeated pieces and lock placements you want to keep.
Start with beds, sofas and dining tables, then add bedside tables, wardrobes, desks and other storage. Red dashed guides help align furniture centres while dragging. Use Undo to revisit a placement, or hold Alt to move without centre snapping.
4. Read the clearance around each piece
Turn on Show clearance after checking the scale. Planner Plus displays dashed distance lines across the layout. Select a piece and use its Clearance direction button to adjust each line separately; distances recalculate without moving the furniture. Furniture rotation also snaps at 45° intervals to help you compare straight and diagonal arrangements.
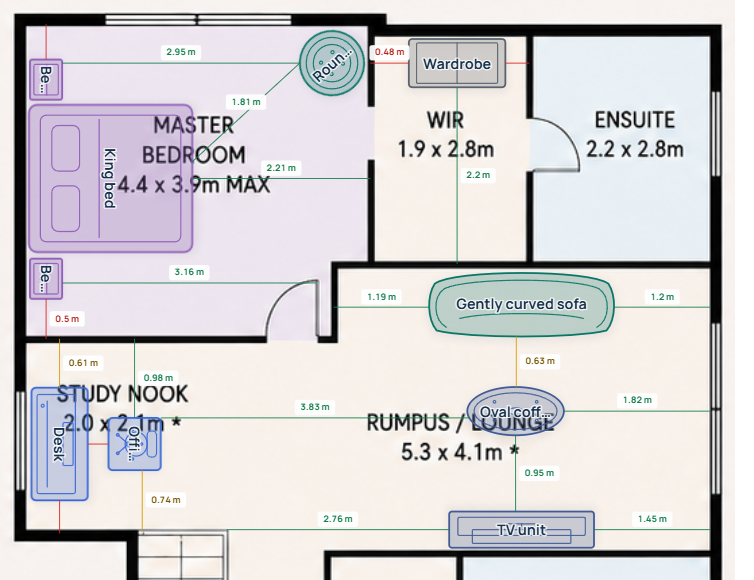
In the close-up below, the wardrobe has a 0.48 m gap beside it, the sofa and coffee table are 0.63 m apart, and the coffee table and TV unit are 0.95 m apart. Compare these spaces with how you want to walk, sit and reach storage. Red and amber indicate smaller gaps; use the number to judge your layout.
- Check door swings, drawer opening and the delivery route separately.
- Use the ruler to check a particular gap when labels are short, hidden or overlapping. Clearance measurements do not simulate a complete walking route or certify accessibility.
5. Reuse your own furniture
In My furniture, paste a supported product link and confirm its configuration, width and depth. Choose Save and try on plan to save the item and place it in the current view, selected and ready to move. Expand More details to edit colours, price and product links, or use Save to my furniture to keep it without placing it.
A valid plan scale is required for trial placement. When clearance is off, newly added furniture automatically shows the space around it; choose Show the whole layout to see the rest. Product pages can omit or mislabel dimensions, so check the measurements before trying the item.
The same collection is available in Measure & plan and Space Designer. Planner Plus includes 100 saved furniture items and 30 product imports per rolling 30 days. Saved product prices are snapshots, not live quotes.
6. Save your layout and return to it
Choose Save workspace in the planning view and wait for confirmation before leaving. It keeps the floor-plan image, calibration, area-planning changes, furniture, measurements and notes together. Reopen it from History to continue working on the layout.
Saving a layout keeps the arrangement in this project. Saving a product in My furniture makes the item reusable in other projects. After the first workspace save, later edits save automatically. Check the save status before leaving.
7. Design one space at a time
In Spaces to furnish, choose a space and check the highlighted area. Move the four sides of its rectangle, preferably along outside wall faces. Bedrooms include their entrance and connected wardrobes; garages are excluded. Choose Edit space to open a cropped view of that area at the same plan scale.
Mix real products, furniture and shapes. Copy as new design before trying an alternative, then name the designs for your client. Each space can hold up to 20 designs; switching changes only that space. Back to floor plan shows the current design in context. All designs and region boundaries save with the workspace. This space workflow requires Planner Plus.
8. Understand the membership benefits
Home Project includes selected-furniture clearance and 10 saved floor-plan projects. Planner Plus adds Space Designer with full-layout clearance, imports from supported retailer links and a reusable My furniture library. It allows 20 standard floor-plan projects and 10 saved workspaces.
Passes last 30, 60 or 90 days with no automatic renewal. Paid tools and cloud-project access stop when access expires; data retention follows the Privacy Policy. The Pricing page explains current purchase and renewal options.