
FloorSQ automatically separated three measurable building parts and estimated 266.0 m². Removing the lower garage, store and workshop changed the reviewed above-ground outline total to 224.4 m². That figure still includes the balcony, so it is not an internal-only area.
The test plan and what makes this a real case
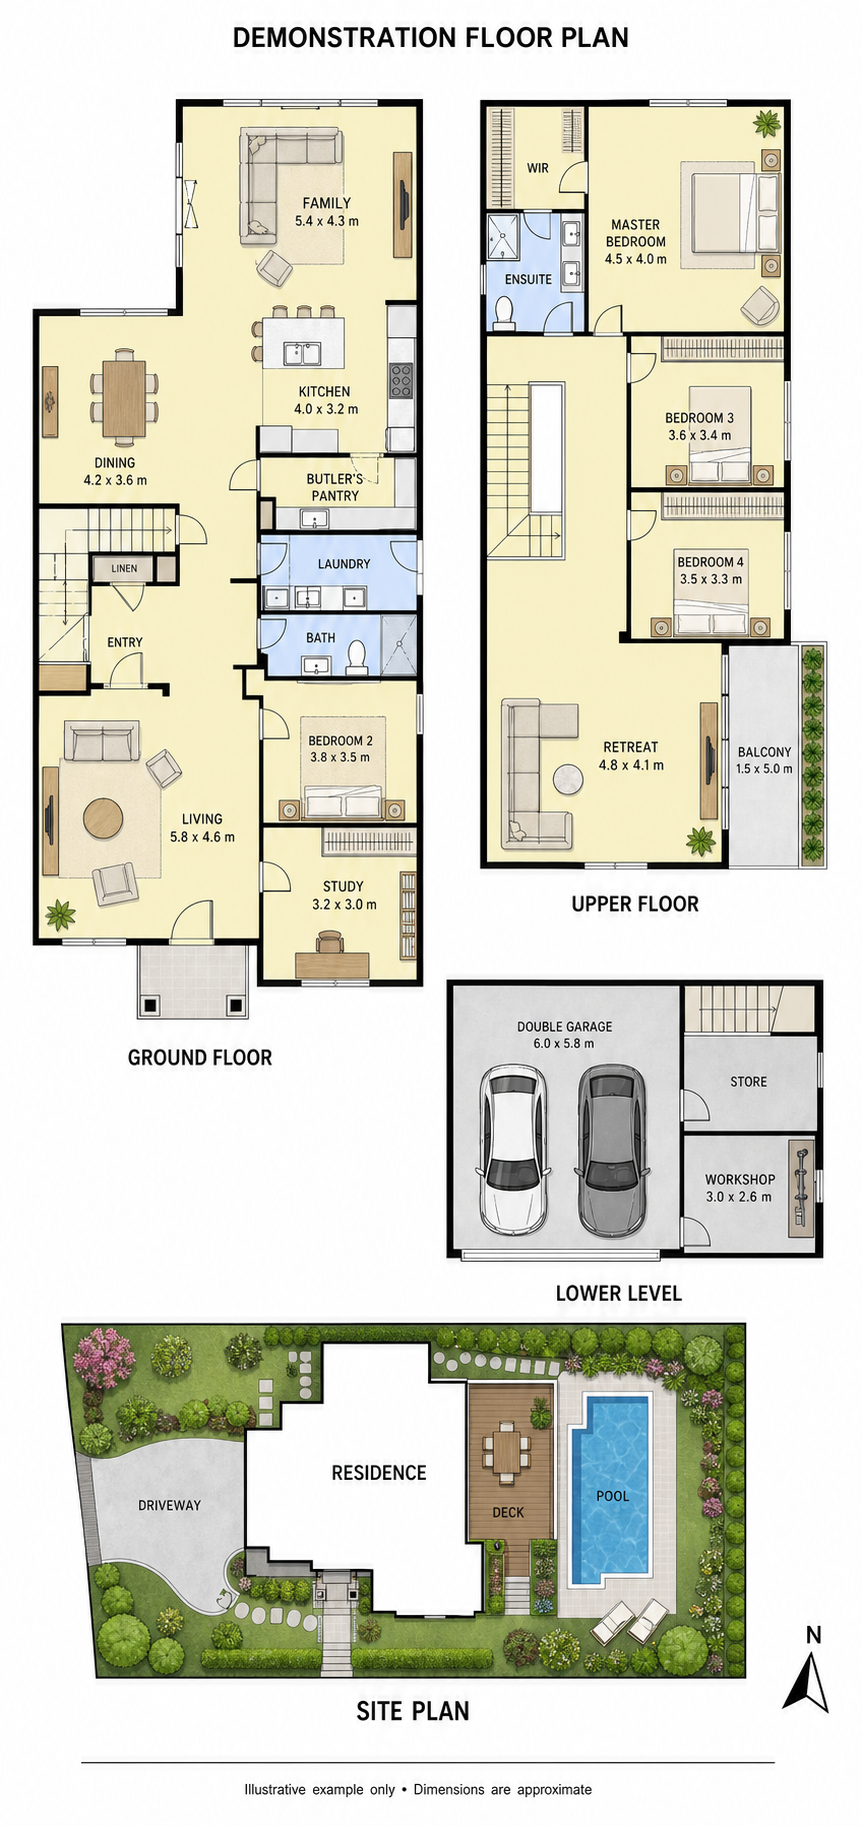
The plan below is an original fictional illustration made for FloorSQ testing. It does not represent a real property, address or sale listing. The upload, screenshots and figures in this article come from one completed run on the live FloorSQ service on 24 August 2026; the result was not drawn into the image in advance.
The single PNG is 862 × 1,825 pixels and contains a ground floor, an upper floor, a lower garage level and a separate site plan with a driveway, pool and landscaping. Its rooms have readable metric dimensions, but the sheet does not state a total building area.
What the first automatic run found
FloorSQ retained three building layouts and ignored the separate site plan. It detected 13 labelled room dimensions and selected the 4.5 × 4.0 m bedroom on the upper floor as the active reference room.
Before any manual change, the service reported 266.0 m² across the three parts. Visual inspection showed the blue outlines following the ground floor, upper floor and lower garage level rather than the driveway, pool or landscaping graphic.
| Detected part | Plan content | Automatic area |
|---|---|---|
| Part 1 | Ground floor | 126.5 m² |
| Part 2 | Upper floor, including balcony | 98.0 m² |
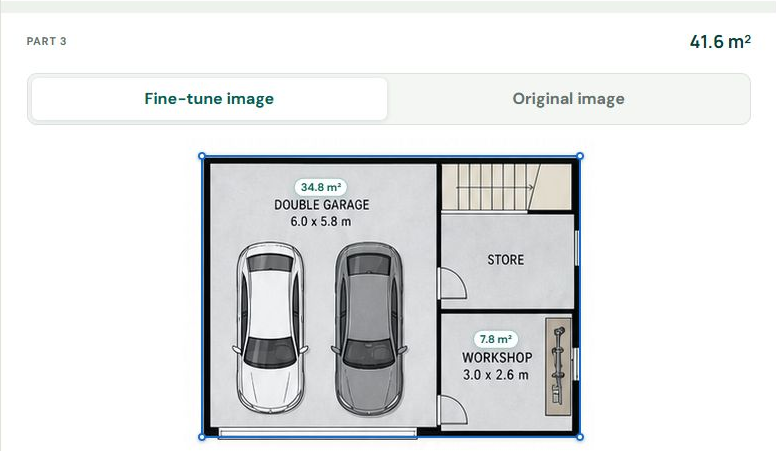
| Part 3 | Garage, store and workshop | 41.6 m² |
| Automatic total | All three detected parts | 266.0 m² |
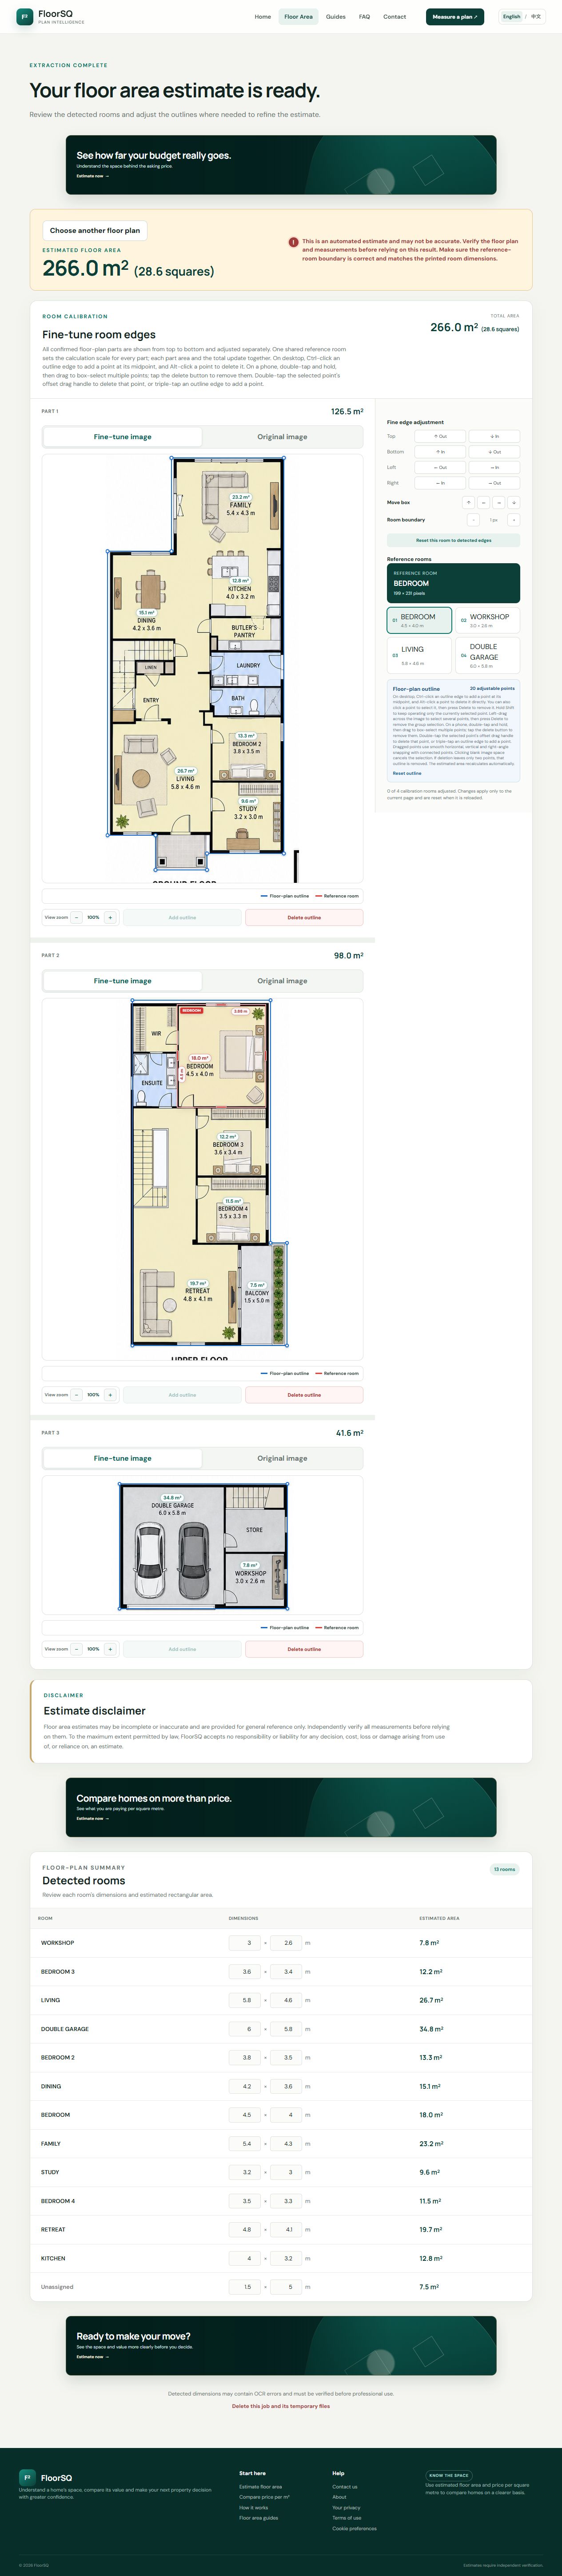
The detected result, level by level
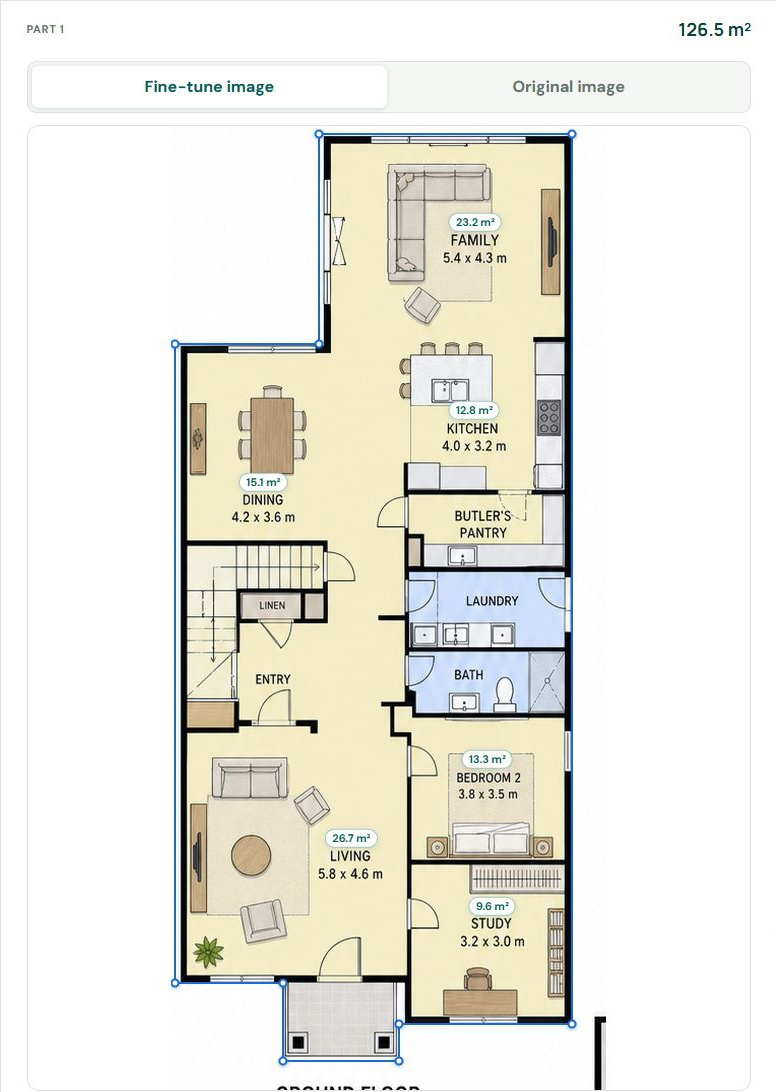
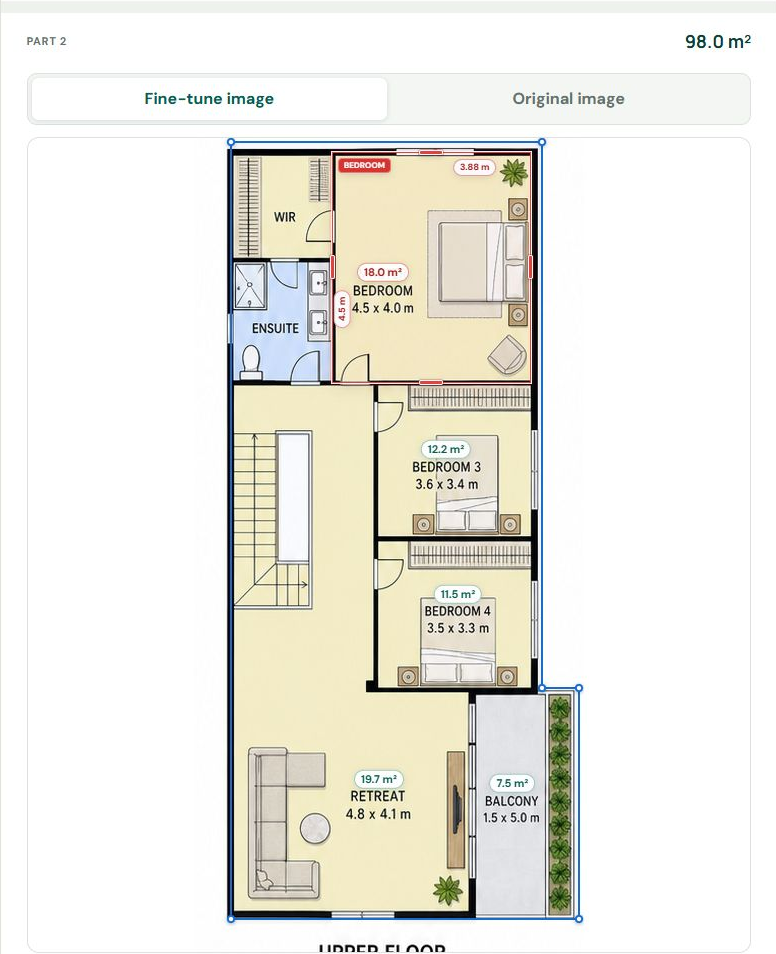
The three screenshots below are taken from the same completed automatic run, before any outline was removed or adjusted. Each shows the detected blue boundary, room-area labels and the area FloorSQ calculated for that part. Click any image to inspect it at full size.
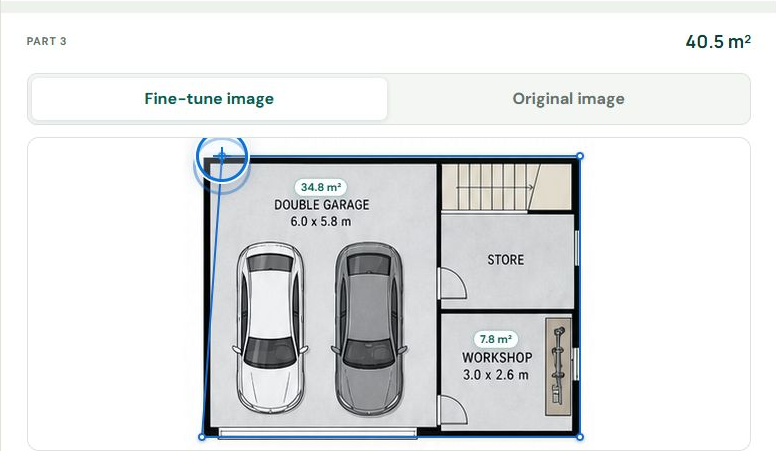
Part 2 also shows the red reference-room box used to calibrate the shared scale. That scale was then applied to the other two detected parts.
Sensitivity check 1: moving an outline control point
To isolate the effect of the blue boundary, we moved the upper-left control point on Part 3 exactly 20 source-image pixels to the right. This deliberately created the diagonal edge visible below; it is a demonstration of how the calculation responds, not a recommended final boundary.
Only Part 3 changed. Its estimate fell from 41.6 m² to 40.5 m², and the overall automatic total fell by the same 1.1 m². Part 1 and Part 2 were unaffected because their outlines did not move.
| Result | Automatic | After point move | Change |
|---|---|---|---|
| Part 1 | 126.5 m² | 126.5 m² | 0.0 m² |
| Part 2 | 98.0 m² | 98.0 m² | 0.0 m² |
| Part 3 | 41.6 m² | 40.5 m² | −1.1 m² |
| Total | 266.0 m² | 264.9 m² | −1.1 m² |
Sensitivity check 2: adjusting the reference-room box
Next we restored all outlines and changed only the shared reference-room box on Part 2. The printed bedroom is 4.5 × 4.0 m. The live overlay initially read 4.5 m vertically and 3.88 m horizontally, with a 199 × 231 px box. We moved its right edge outward by six pixels until the horizontal overlay read 3.99 m and the box measured 205 × 231 px.
Because this room sets the metres-per-pixel scale for every retained part, all three floor estimates changed together. The total fell from 266.0 m² to 258.2 m²—a 7.8 m² difference—even though none of the blue outer outlines moved.
| Result | Automatic | After room-box adjustment | Change |
|---|---|---|---|
| Part 1 | 126.5 m² | 122.8 m² | −3.7 m² |
| Part 2 | 98.0 m² | 95.1 m² | −2.9 m² |
| Part 3 | 41.6 m² | 40.4 m² | −1.2 m² |
| Total | 266.0 m² | 258.2 m² | −7.8 m² |
The review decision: remove the lower garage level
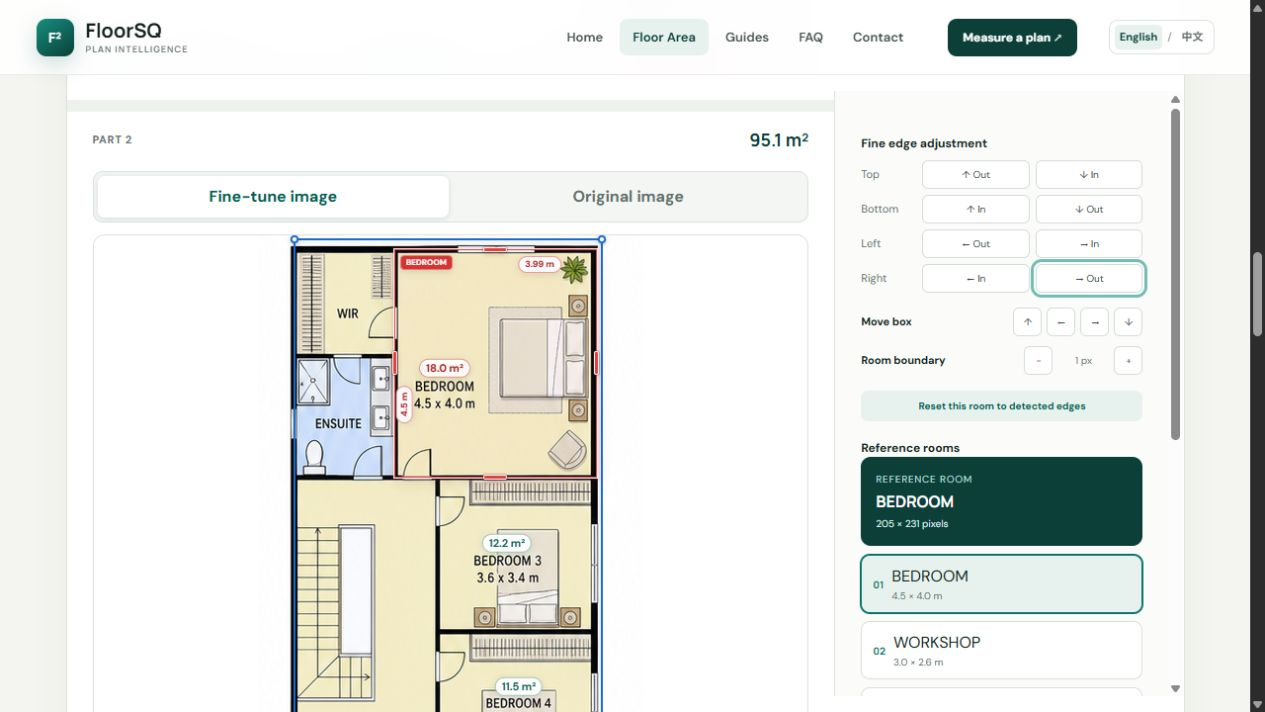
After completing both sensitivity checks, we restored the blue outlines and red reference-room box to the original automatic result. For the reviewed scope below, the only change was deleting Part 3 because we wanted an above-ground residential outline total rather than a total that also included the garage, store and workshop.
The live total changed from 266.0 m² to 224.4 m². Part 1 remained 126.5 m² and Part 2 remained 98.0 m². Each part label is rounded to one decimal place, while the total is calculated from the unrounded values; this is why the two displayed part figures appear to add to 224.5 m² rather than the displayed total of 224.4 m².
| Scope decision | Treatment | Area shown |
|---|---|---|
| Ground floor | Included | 126.5 m² |
| Upper floor | Included, including balcony | 98.0 m² |
| Lower garage level | Excluded by deleting Part 3 outline | 0.0 m² |
| Reviewed above-ground outline total | Ground + upper parts | 224.4 m² |
What FloorSQ handled well
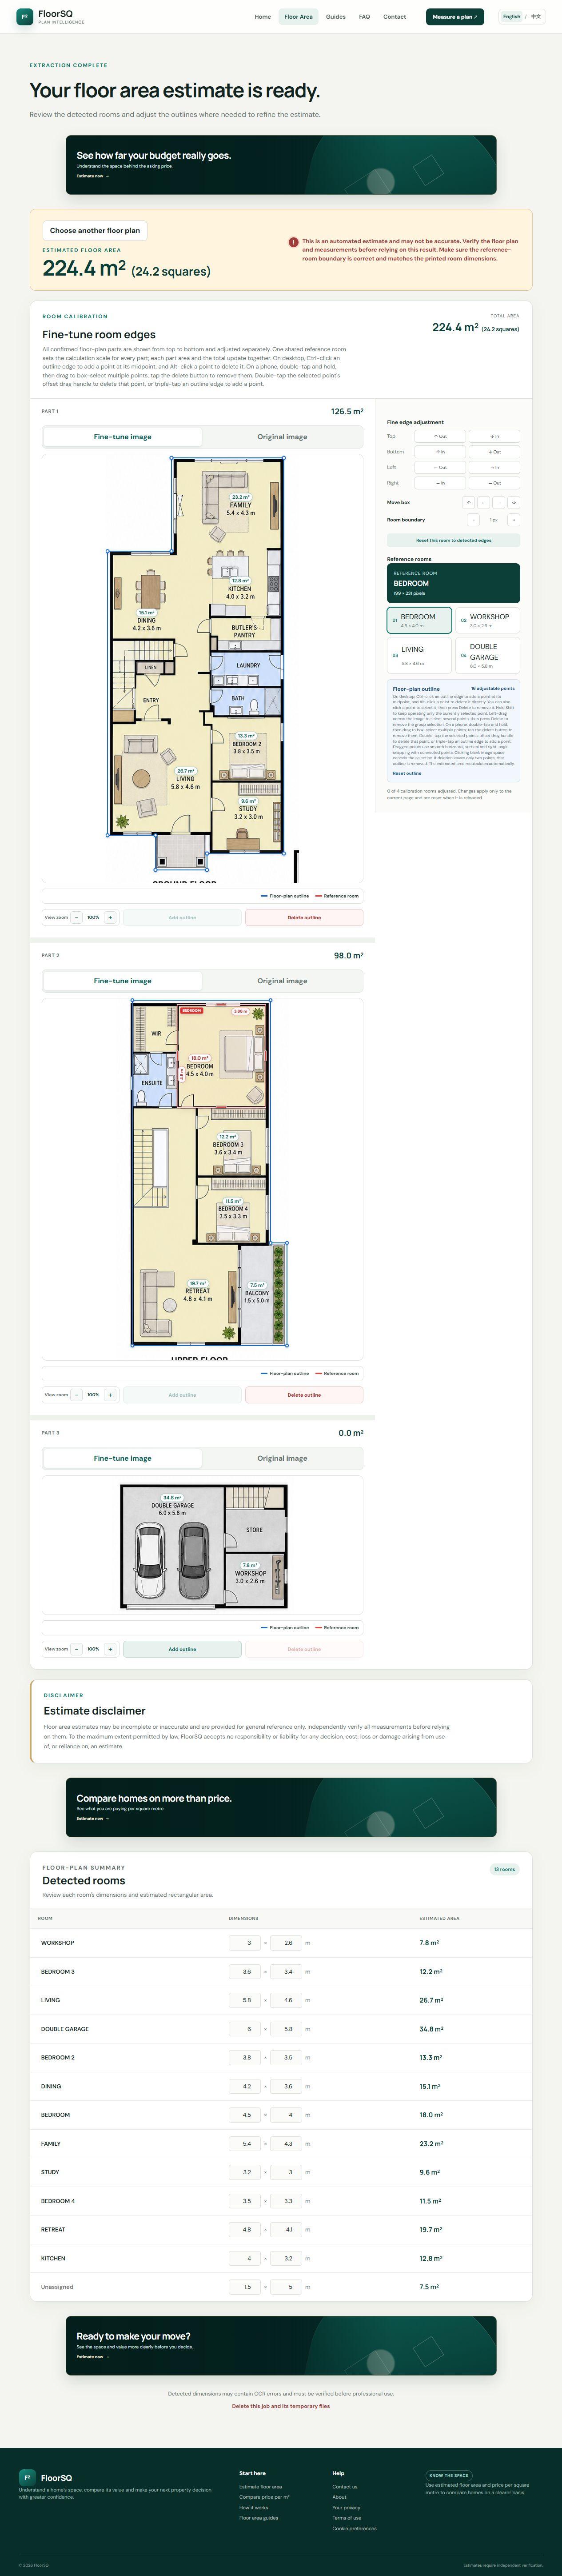
The most useful automatic step was separating the three building layouts from the decorative site plan on the same tall sheet. The result also placed room-area labels directly over the corresponding rooms and kept each building part independently editable.
That made the inclusion decision visible. Instead of accepting one unexplained total, we could see that the first number included a 41.6 m² lower level and remove it with one scoped change.
- Three building parts were retained; the site illustration was not outlined.
- Readable room dimensions were converted into room areas, including Living 26.7 m², Family 23.2 m² and Double Garage 34.8 m².
- The original image and fine-tuned view remained available side by side for checking.
- The total updated immediately when the lower-level outline was removed.
What still required human judgement
FloorSQ cannot know which published area definition a buyer intends to use. A garage, balcony, porch or workshop might belong in one building-area figure and be excluded from an internal-area comparison. The user must choose and describe that basis.
This composite sheet also assumes that all retained floor layouts use a compatible drawing scale because the multi-part result shares one reference room. If separate levels are drawn at different scales, they should be uploaded and checked separately.
- Confirm that the active reference-room box follows the intended wall faces.
- Check every blue outline against the original plan, including small projections and voids.
- State whether garages, balconies, workshops, porches and wall thickness are included.
- Do not call 224.4 m² “internal area” unless the balcony and other non-internal regions are also removed and the boundary convention is verified.
How a property buyer can use this result
The result is useful for understanding what a listing plan appears to show and for asking a more specific question: does an advertised area include the garage, balcony or other non-living space?
If you later calculate price per square metre, use the same inclusion basis for every property. Comparing this 224.4 m² above-ground outline total with another property’s verified internal-only area would not be a like-for-like comparison.
The limitation that matters most
The estimate depends on the supplied image, its labelled dimensions and the boundaries selected in the browser. Marketing plans can contain rounded dimensions, simplified walls, distortion and inconsistent scales between levels.
FloorSQ is not a survey, valuation, legal area definition, construction measurement or contractual record. Where area could affect an important decision, check the contract and registered plans and obtain independent professional advice.